the process
I'm almost there. I put the varnish on the final painting yesterday morning and framed the final drawing last night. I'd hoped to be able to pull off one more painting before the show, but no luck. While working on the last painting I thought I'd photograph it at various stages as I'd never done that with any of my landscapes.
I begin a painting with sketches and/or photos from my files, and draw the basic shapes quickly onto the blank canvas. Then I lay the underpainting down thinly. This is an important part of my process, though not always as successful as I'd like. I usually want the underpainting to be darker than the final work as I want its presence to be 'felt' and that's easier to achieve when painting light on dark. Though a lot of the process is intuitive, I do try and choose complementary colours (a la the colour wheel) to lie under the surface colours, to give it a bit of 'zing'. I use red a lot.
When the underpainting is laid down, I do a quick sketch, with a small sable brush, over the top in 'silver' (iridescent white with a little black). This means that when you see the painting at an oblique angle, you get a bit of shimmer around some of the edges of the shapes (impossible to show in these images). That's also why I use 1.5" deep gallery-wrapped canvas and continue the image around the sides: it creates the illusion that the painting occupies a three-dimensional space.
 Once that's done I start work on the 'real painting'. I have no set order of process, though I often choose the more difficult parts first for practical reasons; if I can't nail them, then I can cut my losses and run! In this case I chose to do the top half of the painting first (trees and sky). You can see the underpainting peeking out around the trees.
 At this point I got so involved with the painting that I completely forgot to take a next photo, and then one after that, so we jump ahead to the final product. After doing the bottom half of the canvas I went through the "this is such crap" phase where I repaint parts, sometimes two or three times (though with each layer I lose surface integrity so try and keep that to a minimum). For example, check out how the sky has changed between the second and final photos.

I am always awed by landscape painters whose work just flies off their brushes, nary an error to correct nor a hair follicle to yank from skull. One day maybe...
I begin a painting with sketches and/or photos from my files, and draw the basic shapes quickly onto the blank canvas. Then I lay the underpainting down thinly. This is an important part of my process, though not always as successful as I'd like. I usually want the underpainting to be darker than the final work as I want its presence to be 'felt' and that's easier to achieve when painting light on dark. Though a lot of the process is intuitive, I do try and choose complementary colours (a la the colour wheel) to lie under the surface colours, to give it a bit of 'zing'. I use red a lot.
When the underpainting is laid down, I do a quick sketch, with a small sable brush, over the top in 'silver' (iridescent white with a little black). This means that when you see the painting at an oblique angle, you get a bit of shimmer around some of the edges of the shapes (impossible to show in these images). That's also why I use 1.5" deep gallery-wrapped canvas and continue the image around the sides: it creates the illusion that the painting occupies a three-dimensional space.
 Once that's done I start work on the 'real painting'. I have no set order of process, though I often choose the more difficult parts first for practical reasons; if I can't nail them, then I can cut my losses and run! In this case I chose to do the top half of the painting first (trees and sky). You can see the underpainting peeking out around the trees.
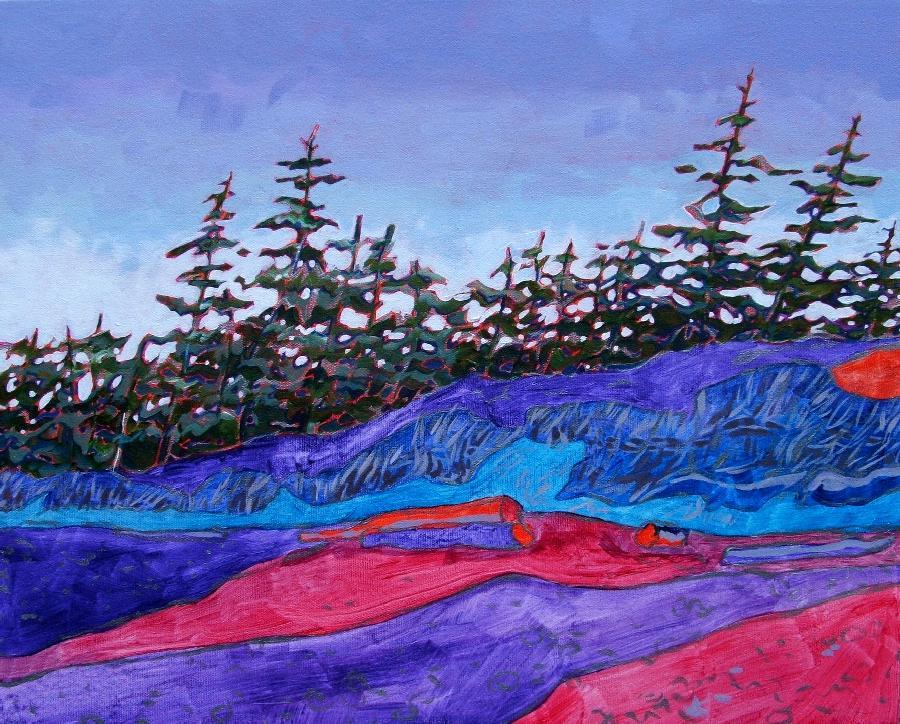 At this point I got so involved with the painting that I completely forgot to take a next photo, and then one after that, so we jump ahead to the final product. After doing the bottom half of the canvas I went through the "this is such crap" phase where I repaint parts, sometimes two or three times (though with each layer I lose surface integrity so try and keep that to a minimum). For example, check out how the sky has changed between the second and final photos.
I am always awed by landscape painters whose work just flies off their brushes, nary an error to correct nor a hair follicle to yank from skull. One day maybe...
posted by andrea at 9:03 a.m.
![]()
![]()
19 Comments:
I love seeing the process. It's like being at Andrea's art school. You've even given us a list of some of your materials used. A perfect lesson plan, thanks.
Thanks for a look at the process. It's very interesting to get a glimps of how your mind works, and I love the finished result!
Andrea, thank you so much. this is awsome seeing the process. I can see the underpainting coming through.
I know your show is going to be a success.
I am awed by your process, Andrea! It's amazing how you go from start to finish...you know I love your work, so to see the process is truly special. This one's a beauty. Good luck - your show is going to be outstanding!
I'm awed by artists (like you!)who can create such a feeling of actually being inside the landscape, as I get from this painting, never mind whether it's by creative flow or by painstaking 2 steps forward 1 step back process. The end result is still awesome! (although admittedly one way is a lot easier on your nerves than the other!!)
I can't say anything more than the previous. But I sure like it!!! Thanks! :o) and =^..^= and >^.^<
Fascinating insight, I knew there was a reason why I don't paint - all that underpainting I just couldn't handle. Hope the show goes great.
Detlef
http://www.detlefjumpertz.com
Andrea this is great - so you paint a colour negative first!!!
I was a bit worried today when on another blog I read that complementary colours are ones next to each other on the colour wheel - at least you use the word the same way I would.
I also see that maybe some of my old paintings never got past the first stage and were too startling for other people - maybe I should try out your method.
I woke up this morning knowing I'd be back to painting with acrylics soon and that I must get a flour shaker to spread the sand with - I'll have to post one of my old paintings to explain that...
Which brand of paints do you use?
I was so relieved that you didn't finish the entry with "Okay, YOUR turn now"
Brian: Hmmm ... it's that old you can take the teacher out of the classroom thing again ...
Artnut: We've only scratched the surface, mwa ha ma...
Toni, Carla and Merlnprincesse: Thanks for your encouragement.
Andy: What's that old chestnut ... "suffering for one's art"? :)
Detlef: Yeah, it's definitely an example of delayed gratification.
Caroline: A colour negative -- I love that! That other blogger meant analogous. Looking forward to your post (I know an atist who uses coffee grounds!) and seeing you paint again! I use a Canadian brand called Stevenson.
Kyknoord: Ha! But I *can* keep you in for detention for being cheeky to the teacher...
really beautifully done andrea! so nice of you to show and talk about the process at the final hour. I hope you won't suffer postpartum depression now and enjoy yourself at your show and even just getting back into everyday life again. The beauty of your work is apparent to all who view it and I know you will have a successful show! I love the trees and seeing the reddish colour peeking through the tree area. Bella!!!
That last pic looks SO much like the photos my friends brought back from Vancouver and Victoria island a few months ago. The huge pieces of driftwood you get there are amazing.
Wow. The underpainting is like the engery field and that engergy may not be what we all see when we look out at a beautiful scene like that, but it is there. Fascinating process. Thank you for sharing it online.
Andrea, I'm in awe of your process! As a non-artist, I'm blown away by all of the steps, the mental/thought process, the complex ways the layers and colors work together. Very, very cool. And awesome of you to share it. Thanks!
That sounds so cool how you explain your processI could never paint! I'm too freaking impatient! Your stuff is all great. :)
Hi Andrea,
Thanks for dropping by my crazy animal blog. I hope that my Fire Dog didn't scare your dog too much.
Cheers
I loved, loved, loved reading this. How facinating to be able to go along side you in the process. And the final product is stunning, as usual. Good luck with the show!
great beautiful paintings!
Wowwweeee this is beautiful- how incredible to paint the undercoat with complimentary colours- it works a treat. :o)
Post a Comment
<< Home