1001 uses for acrylic medium
Medium for acrylic painters is like the flour in a baker's kitchen. In simplest terms, it is the polymer emulsion in which pigments are suspended to create acrylic paint, but it has many other uses. Consider this an advertisement for the stuff, thinly disguised as an art lesson. Third possible interpretation: it's a self-congratulatory essay on my pioneering photo display technique. Or, as Greg would say, "Giving away all your secrets again, eh?"
Sometime last year I heard about making polymer transfers from magazine pictures for use in collages. The technique is simple: apply several coats of acrylic medium to the magazine cutout, allowing time for each layer to dry. When the final layer is dry, soak it in some warm, soapy water and then carefully peel off the paper. What you're left with is the image embedded in a thin sheet of plastic. Magic!
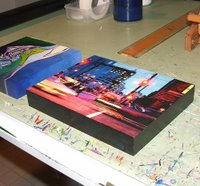
The first thing that occurred to me was that I could use my own digital photos, printed using a good-quality colour laser printer. Before I knew it I'd tried it myself and used the photos as collage elements in an acrylic painting. But recently I decided that I wanted to try the technique as a way to display digital photos as artwork. Here's what I came up with:
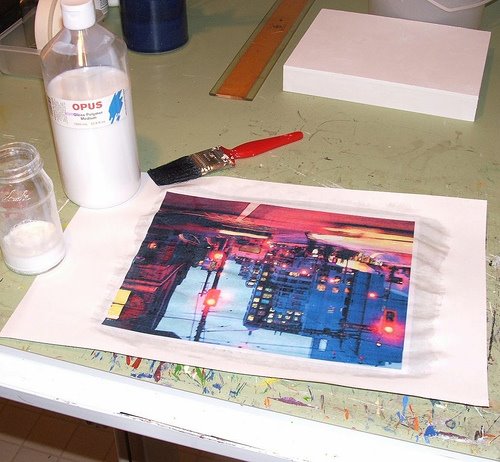
 Using acrylic gloss medium, I applied ~10 coats of medium to my print. This took several days as I wanted each layer to dry completely. I used a small house painter's brush, stroking in a different direction each time. The resulting surface texture is a little like linen.
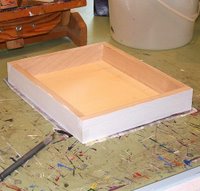
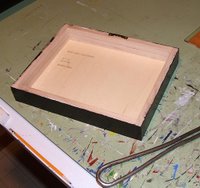
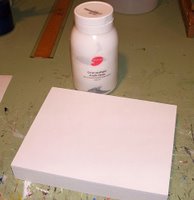 Meantime, I prepared the surface that would take the transfer. Opus cradled panels are perfect for this as the wooden panel is smooth, and the cradled sides mean it can be hung as-is to create a contemporary look without framing. But first they must be primed with several coats of gesso.
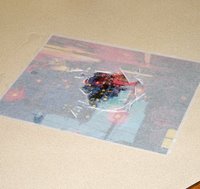 Once dry, I soaked the picture in warm, soapy water for a few minutes, gently peeled the paper off the back, rinsed and hung the polymer transfer up to dry.
 Next step: I applied a thin layer of my amazing and indispensable acrylic medium to the surface of the cradled panel and placed the transfer down on it. You will see that the image is slightly bigger than my 8" x 10" panel. I carefully pressed the image flat, working out the bubbles as I went. You will never master all the bubbles, no matter how careful you are, so I dealt with the last few stubborn hold-outs by pricking them with the tip of my x-acto knife.
 When I was satisfied that the image has adhered to the surface properly, I flipped it over and slowly cut away the excess transfer, using an x-acto knife. Take your time!
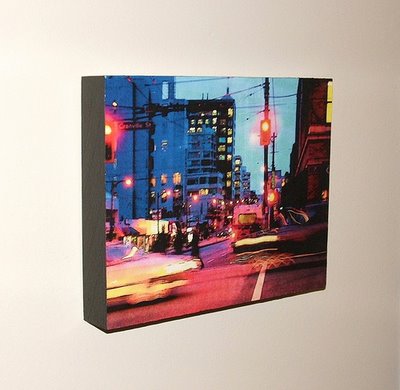
 Almost there! I painted the edges using black acrylic paint because They say that 'black goes with everything,' but that's up to you. But wait! We're not done with our fabulously versatile acrylic medium. Cut 50-50 with water, gloss medium can make a decent varnish to seal the painted sides.
 Putting hanging wire on the back of these panels is a bit tricky, so I used the kind of hanger you can get in any hardware store and voila! Photo art!
Sometime last year I heard about making polymer transfers from magazine pictures for use in collages. The technique is simple: apply several coats of acrylic medium to the magazine cutout, allowing time for each layer to dry. When the final layer is dry, soak it in some warm, soapy water and then carefully peel off the paper. What you're left with is the image embedded in a thin sheet of plastic. Magic!
The first thing that occurred to me was that I could use my own digital photos, printed using a good-quality colour laser printer. Before I knew it I'd tried it myself and used the photos as collage elements in an acrylic painting. But recently I decided that I wanted to try the technique as a way to display digital photos as artwork. Here's what I came up with:
 Using acrylic gloss medium, I applied ~10 coats of medium to my print. This took several days as I wanted each layer to dry completely. I used a small house painter's brush, stroking in a different direction each time. The resulting surface texture is a little like linen.
 Meantime, I prepared the surface that would take the transfer. Opus cradled panels are perfect for this as the wooden panel is smooth, and the cradled sides mean it can be hung as-is to create a contemporary look without framing. But first they must be primed with several coats of gesso.
 Once dry, I soaked the picture in warm, soapy water for a few minutes, gently peeled the paper off the back, rinsed and hung the polymer transfer up to dry.
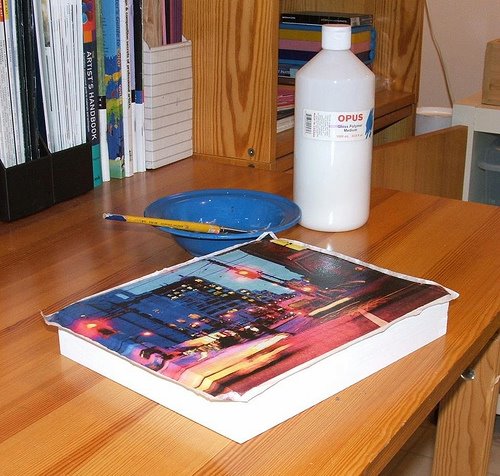 Next step: I applied a thin layer of my amazing and indispensable acrylic medium to the surface of the cradled panel and placed the transfer down on it. You will see that the image is slightly bigger than my 8" x 10" panel. I carefully pressed the image flat, working out the bubbles as I went. You will never master all the bubbles, no matter how careful you are, so I dealt with the last few stubborn hold-outs by pricking them with the tip of my x-acto knife.
 When I was satisfied that the image has adhered to the surface properly, I flipped it over and slowly cut away the excess transfer, using an x-acto knife. Take your time!
 Almost there! I painted the edges using black acrylic paint because They say that 'black goes with everything,' but that's up to you. But wait! We're not done with our fabulously versatile acrylic medium. Cut 50-50 with water, gloss medium can make a decent varnish to seal the painted sides.
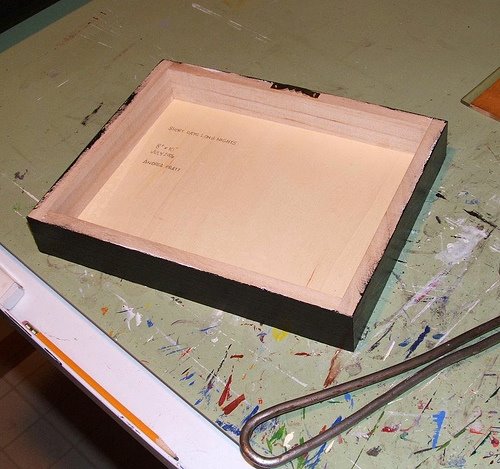 Putting hanging wire on the back of these panels is a bit tricky, so I used the kind of hanger you can get in any hardware store and voila! Photo art!
posted by andrea at 8:28 a.m.
![]()
![]()
33 Comments:
Oooh ooh ooh ooh! I HAVE To do that!
WOW!! That's very neat!! I love all these paintings and artworks you have posted lately, wonderful work as always!! :)
Teacher, teacher...can you teach me?
Seems like something I could do. This is a great idea and technique.
I have tried polymer transfers a few times, but ended up with less than satisfactory results. I think it takes a lot of playing around to get it just right. I know a local artist who does mixed media collages that are comprised mostly of transfers. She takes old blueprints and maps, etc., enlarges them on a big copy machine and makes rather large pieces. Her stuff is very cool! She told me that it really took her a while to get a process that worked. I'm quite impressed with this piece...perhaps I'll give it a try again:>
Thats a good trick, Im linking to your blog now, just made some time to do adminy type things and sorting out links is my first task, and you are the first!
You and your website are an incredible resource. I had other plans for the evening but instead spent the whole time on your site (and following links elsewhere) and I'm glad I did. I've been thinking about the marketing and art business side of painting lately so it was terrific to read the recent posts and comments about that.
Your paintings are fantastic, your writing brave, humorous, intelligent and full of good information and style. What a treat. I've added your site to my links and look forward to many more visits. Thanks for the nice comment on my site!
Stylish. Now how about those 998 other uses?
I'm obviously missing something here... *Why* do you want to tranfer the photo? In the example showcased, it looks like it is transfered in its entirety... Is there a reason this is preferable to just using you medium to adhere the actual photo or print to your surface and seal it???
What am I missing?
i did this some years back and it looks so mch better when you (Andrea) use your photos using this technique! This would be cool when you have a show to mix in some of these and see what your collectors think!
Do you go to a copy place that has a high quality laser printer or do you use your own?
WAO! this is really kind of you! an art class! I have medium and I never used it in an interesting way..........now I will use it more. Thanks Andrea!
Cece: All it takes is a good photo and some time...
Alina, Brian, Muddy Red Shoes & Caty: Thanks.
Carla: It does take some time to get it right. I actually made this transfer twice as the first one was too thin.
Jana: I'm blushing. I am also compulsive. :)
Kyknoord: Tsk tsk. I only have 997 to go!
Tara: Good question. The point is better served in the collage example: to create a transparent layer that you can incorporate into the rest of your composition. In this case it is a more archivally-sound way to create something permanent (more important for paintings than illustrations whose 'lifespan' can be lengthened through reproduction) and I've had some trouble with paper buckling and wrinkling. But certainly it would be a whole lot simpler just to do it as you describe! :)
Val: I get my husband to make a copy on his office printer (shh).
I love matte medium too! I paint with oils, but I do a zillion things with matte medium. One thing I've taken to doing with my paintings is basically what you've done above with the photo -- only I print out my drawing, then matte it to a prepared canvas or one of those premade pieces of gessoed masonite with the frame on the back, and then I paint right on top of my matted down drawing, and I don't have to transfer my drawing. Since my paintings are pretty detailed, I used to spend SO MUCH time transfering. Thank you matte medium! (I also used it recently to glue collage images (mostly big letters to spell out words) onto a table, then mosaiced over them with clear glass so you can read the words through the glass. I'll be putting pics up soon.
Kyknoord: D'oh! Obviously I can't count. That's why I do this rather than managing your accounts!
Laini: Exciting -- I can hardly wait to see. I can see how great these methods would be for digital illustrators, too. Are you listening, Carla? :)
I'd never heard of acrylic medium until now. What you did with it is really cool though!
gotta love acrylic medium. I use it to mix with wall paper paste to create paste papers and to do the other type of transfers using my inkjet printer.
As soon as I am done with these wedding invites maybe we should do a collaborative how to with acrylic medium? just a thought. ok I have to get back to work here. Have a great day
dont cha just love the stuff? i was so pleased to get rid of the acetone and much toxic waste from college days and make everything easily traferable with acrylic mediums ...
golden's line is fabulous and has oodles and oodles of ideas to go with each of their specific mediums...
go to their site for examples - there just isn't enough time in the day!
love what you did with the photo andrea!!
OMG! I never knew that's how it was done! I have acrylic medium! I'm going to try this, thank you Andrea!
How clever are you!!! I am blown away. Love this idea.
a.
Yes, I love this technique as well ! I just recently learned how to do this myself and it's fun stuff ! It can be applied to so many surfaces etc.Really love this piece you did, awesome colors ! :)
You are so fabulously creative. I hardly ever comment because I don't have anything artistical to add but I enjoy looking at your work. This idea I may even attempt.
excellent info! i'll have to file that away with my list of wonderful things to try :) thanks so much for sharing!
Aha! Beautiful results and educational step-by-step!!! Can’t live without gloss gel medium, that is all there is to it, it makes great glazing as well… Sorry I have been in hiding – but what a gorgeous work you have – love your large format paintings, very inspiring!
you are an angel, muac muac muac!...
awesome work - and a class too - bravo andrea!!!
Wow! Your digital piece looks amazing this way!! I love this idea - thank you for the step by step tutorial!!
Fascinating and inspirational stuff, Andrea.
How did you use the coat hanger/ could I see a photo of the reverse of your finished work as regards the picture hanging?
Justin: I'm not sure I understand the question. Coat hanger? If you enlarge the second-to-last photo you'll see the reverse of the whole unit, with the little tooth hanger at the top.
This is very effective - thanks for the great tutorial.
I've experimented with various transfer methods over the years and this is one I use before I discovered a much faster way that doesn't leave such a think coat of medium over your image. If you get a laser copy of your image, color or black and white it works best, but you can also use magazines, newspaper, or any printed material as long as it isn't from an inkjet printer. The you need a relatively sturdy primed surface (I like to use cradled panels for mine). Apply a generous layer of gel medium directly to your image then press it onto your panel, making sure that it is totally smooth without any ripples etc. Then wait for it to dry....say an hour to be safe. Then get a bowl of water and starting from the middle of the image wet the paper and gently rub/push away the paper and the ink will stay attached to the panel. Once you think you've got all the paper off wait a few minutes for it to dry, if there are still white patchs you aren't finished yet! I also like to carefully take a super fine sandpaper to mine at the end, just to get any remains of the paper. Just another method to try...
Thanks, Anonymous. I have to try that. It makes sense: acrylic touches image and transfers ~ no matter what angle you approach it from! For a big project in Oct. I didn't even bother to remove the paper, just worked it right in.
Hi there,
Just incase it is of any interest to you, a while back i came across a british labels company who sold me a batch of laser labels for a really low price. If you are at all interested then it may be worth taking a look at their website.
Can't wait to try this, but have a few questions. 1. Are folks saying the image will transfer whether you apply medium to front or back? 2. Is there a way to get a completely smooth matte or gloss acrylic coating over the image, avoiding any brushstrokes, texture, or bubbles? 3. If instead of transferring I just adhere the print, in this case an 8-color printout on toothy art paper, is there a way to keep the feel of the paper while sealing and protecting it, or does the acrylic unavoidably change it? Thanks!
GG: I think it depends on what you're using. I haven't tried the method of applying it to the back but if you're using a magazine image it'll pick up what's on the back, not the front. Bubbles are hard to avoid but not impossible, with practice -- and the small ones always disappear anyway. As for a completely smooth surface, don't use gel. Gloss liquid would work better. You could try applying it with one of those sponge brushes. The acrylic will always change the texture of the paper somewhat if you want to apply it directly. You might want to experiemnt on small scraps just for comparative purposes. Good luck! (And if anyone else reading this wants to expand or enlighten, be my guest!)
Oh wow this looks like a great project!! I'm not sure I have the patience for it though!! Nonetheless, I think I will give this a try soon. Thanks so much for sharing your process.
~Kelly~
Post a Comment
<< Home